Assigning Custom Functions to Buttons and Dials (EOS M6)
Solution
1. Press the power button to turn the camera on.
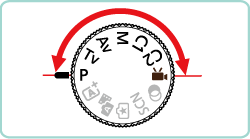
2. Set the mode dial to <C1>, <C2>, <M>, <Av>, <Tv>, <P> or < >.
>.
 >.
>.
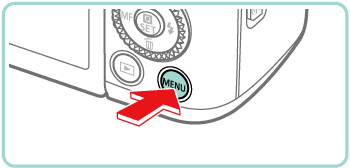
3. Press the [MENU] button to display the menu screen.
4. Press the [  ] [
] [  ] buttons or turn the [
  ] dial to select the [
  - 1 ] tab.
 ] [
] [  ] buttons or turn the [
  ] dial to select the [
  - 1 ] tab.
Press the [  ] [
] [  ] buttons or turn the [
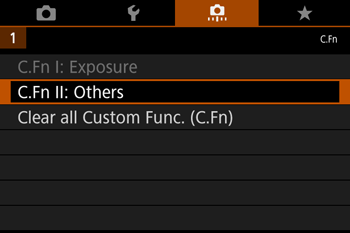
  ] dial to select [C.Fn II: Others], and then press the [
  ] button.
 ] [
] [  ] buttons or turn the [
  ] dial to select [C.Fn II: Others], and then press the [
  ] button.

5. Press the [  ] [
] [  ] buttons or turn the [
  ] [
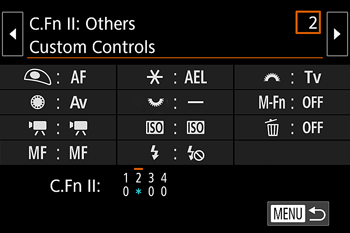
] [  ] dials to select [Custom Controls-2], and then press the [
  ] button.
 ] [
] [  ] buttons or turn the [
  ] [
] [  ] dials to select [Custom Controls-2], and then press the [
  ] button.
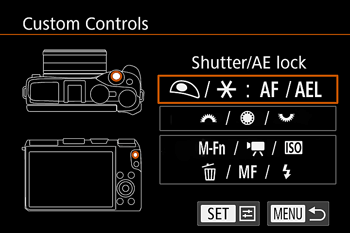
6. When assigning the shutter button or the [  ] button, press the [
  ] [
] [  ] buttons or turn the [
  ] dial to select the shutter button/ [
  ] button, and then press the [
  ] button.
 ] button, press the [
  ] [
] [  ] buttons or turn the [
  ] dial to select the shutter button/ [
  ] button, and then press the [
  ] button.
7. Press the [  ] [
] [  ] buttons or turn the [
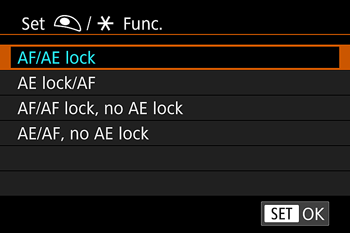
  ] dial to choose a function.
 ] [
] [  ] buttons or turn the [
  ] dial to choose a function.
When you press [  ] to exit the setting, the screen in step 6 will reappear.
 ] to exit the setting, the screen in step 6 will reappear.
| Button | Function | Setting Details |
Shutter button or [  ] button ] button | [AF/AE lock] | Enable exposure lock by pressing the [  ] button, after focusing by pressing the shutter button halfway. ] button, after focusing by pressing the shutter button halfway. |
| [AE lock/AF] | Enable exposure lock by pressing the shutter button halfway, and focusing by pressing the [  ] button. ] button. | |
| [AF/AF lock, no AE lock] | Enable focus lock by pressing the [  ] button. ] button. | |
| [AE/AF, no AE lock] | Enable exposure compensation by pressing the shutter button halfway, and focusing by pressing the [  ] button. ] button. |
1. Press the power button to turn the camera on.
2. Set the mode dial to <C1>, <C2>, <M>, <Av>, <Tv>, <P> or < >.
>.
 >.
>.
3. Press the [MENU] button to display the menu screen.

4. Press the [  ] [
] [  ] buttons or turn the [
  ] dial to select the [
  - 1 ] tab.
 ] [
] [  ] buttons or turn the [
  ] dial to select the [
  - 1 ] tab.
Press the [  ] [
] [  ] buttons or turn the [
  ] dial to select [C.Fn II: Others], and then press the [
  ] button.
 ] [
] [  ] buttons or turn the [
  ] dial to select [C.Fn II: Others], and then press the [
  ] button.

5. Press the [  ] [
] [  ] buttons or turn the [
  ] [
] [  ] dials to select [Custom Controls-2], and then press the [
  ] button.
 ] [
] [  ] buttons or turn the [
  ] [
] [  ] dials to select [Custom Controls-2], and then press the [
  ] button.
6. Press the [  ] [
] [  ] buttons or turn the [
  ] [
] [  ] dials to choose [Dials], and then press the [
  ] button.
 ] [
] [  ] buttons or turn the [
  ] [
] [  ] dials to choose [Dials], and then press the [
  ] button.
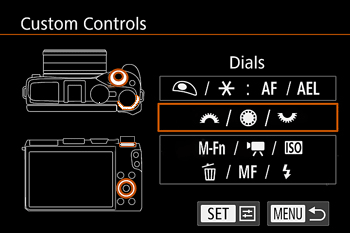
7. Press the [  ] [
] [  ] [
] [  ] [
] [  ] buttons or turn the [
  ] [
] [  ] dials to choose the dial to assign, and then press the [
  ] button.
 ] [
] [  ] [
] [  ] [
] [  ] buttons or turn the [
  ] [
] [  ] dials to choose the dial to assign, and then press the [
  ] button.
(You can see [  ]/ [
]/ [  ] selected as an example in the picture below).
 ]/ [
]/ [  ] selected as an example in the picture below).
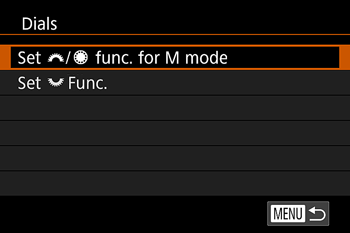
| Dials | Setting Details |
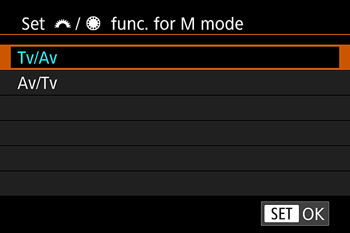
[  ] [ ] [  ] dials ] dials | By assigning [Av/Tv], in [M] mode you can set aperture value with the [  ] dial and shutter speed with the [ ] dial and shutter speed with the [  ] dial. ] dial. |
[  ] dial ] dial | Enable configuration of the assigned function in [Tv], [Av], [P], [M], or [  ] mode by turning the [ ] mode by turning the [  ] dial. ] dial. |
NOTE
- When assigning the [
 ] dial, press the [
  ] [
] [  ] buttons to choose the shooting mode, then choose a function to assign (either press the [
  ] [
] [  ] buttons or turn the [
  ] dial), and then press the [
  ] button.
8. Press the [  ] [
] [  ] buttons or turn the [
  ] dial to choose a function.
 ] [
] [  ] buttons or turn the [
  ] dial to choose a function.
When you press [  ] to exit the setting, the screen in step 7 will reappear.
 ] to exit the setting, the screen in step 7 will reappear.
Assigning Functions to the [M-Fn] Button/ Movie Button/ [ISO] Button/ Erase Button/ [MF] Button/ Flash Button
1. Press the power button to turn the camera on.
2. Set the mode dial to <C1>, <C2>, <M>, <Av>, <Tv>, <P> or < >.
>.
 >.
>.
3. Press the [MENU] button to display the menu screen.

4. Press the [  ] [
] [  ] buttons or turn the [
  ] dial to select the [
  - 1 ] tab.
 ] [
] [  ] buttons or turn the [
  ] dial to select the [
  - 1 ] tab.
Press the [  ] [
] [  ] buttons or turn the [
  ] dial to select [C.Fn II: Others], and then press the [
  ] button.
 ] [
] [  ] buttons or turn the [
  ] dial to select [C.Fn II: Others], and then press the [
  ] button.

5. Press the [  ] [
] [  ] buttons or turn the [
  ] [
] [  ] dials to select [Custom Controls-2], and then press the [
  ] button.
 ] [
] [  ] buttons or turn the [
  ] [
] [  ] dials to select [Custom Controls-2], and then press the [
  ] button.
6. When assigning the [M-Fn], movie, [ISO], [  ], [MF] or flash button, press the [
  ] [
] [  ] [
] [  ] [
] [  ] buttons or turn the [
  ] dial to select the button group from the menu, and then press the [
  ] button.
 ], [MF] or flash button, press the [
  ] [
] [  ] [
] [  ] [
] [  ] buttons or turn the [
  ] dial to select the button group from the menu, and then press the [
  ] button.
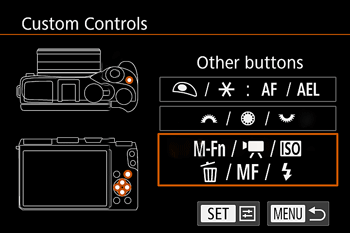
7. Press the [  ] [
] [  ] [
] [  ] [
] [  ] buttons or turn the [
  ] [
] [  ] dials to choose the button to assign, and then press the [
  ] button.
 ] [
] [  ] [
] [  ] [
] [  ] buttons or turn the [
  ] [
] [  ] dials to choose the button to assign, and then press the [
  ] button.
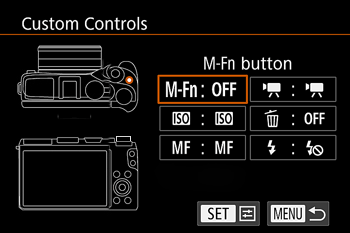
8. Press the [  ] [
] [  ] [
] [  ] [
] [  ] buttons or turn the [
  ] [
] [  ] dials to choose a function.
 ] [
] [  ] [
] [  ] [
] [  ] buttons or turn the [
  ] [
] [  ] dials to choose a function.
When you press [  ] to exit the setting, the screen in step 7 will reappear.
 ] to exit the setting, the screen in step 7 will reappear.
| Button | Setting Explanation |
| [M-Fn]button | Press the button to activate the assigned function. |
| Movie button | |
[  ] ([ISO] button) ] ([ISO] button) | |
[  ] ([ ] ([  ] button) ] button) | |
[  ] ([MF] button) ] ([MF] button) | |
[  ] ([ ] ([  ]) button ]) button |
NOTE
- To restore default functions to the [M-Fn] button, movie button, [ISO] button, [
 ] button, [MF] button and [
  ] button, choose [OFF], [
  ], [
], [  ], [OFF], [MF] and [
  ].
]. - If you prefer not to assign any functions to the button, choose [OFF].
- Icons labeled with [
 ] when buttons are assigned indicate that the function is not available under current function conditions.
 - To specify whether to capture images in both JPEG and RAW format simultaneously each time a button is pressed, assign [
 ].
]. - To preview the depth of field with your specified aperture value as you hold down a button, assign [
 ].
]. - To deactivate screen display when a button is pressed, assign [
 ].
].


