Using a USB cable to charge the camera's battery (PowerShot G9 X Mark II)
Solution
Charge the battery pack by using the supplied battery pack with an optional Compact Power Adapter CA-DC30/CA-DC30E and Interface Cable IFC-600PCU.
- Procedures for using a USB cable to charge the included battery are explained below.
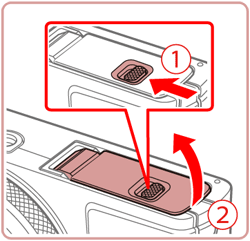
1. Slide the cover  and open it
  .
.
 and open it
  .
.
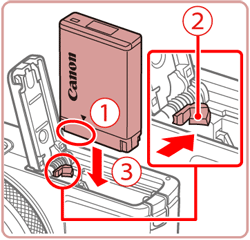
2. Insert the battery.
- Holding the battery pack with the terminals
 facing as shown, press the battery lock
  in the direction of the arrow and insert the battery pack until the lock clicks shut.
 - If you insert the battery pack facing the wrong way, it cannot be locked into the correct position. Always confirm that the battery pack is facing the right way and locks when inserted.
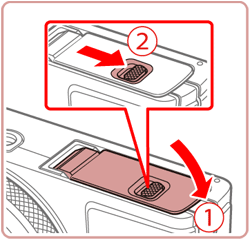
3. Lower the cover  and hold it down as you slide it, until it clicks into the closed position
  .
.
 and hold it down as you slide it, until it clicks into the closed position
  .
.
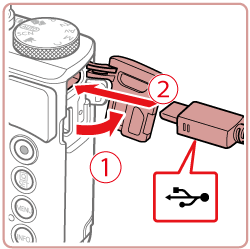
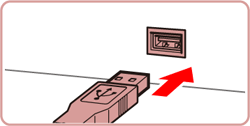
4. With the camera turned off, open the cover  . With the smaller plug of the included interface cable in the orientation shown, insert the plug fully into the camera terminal
  .
.
 . With the smaller plug of the included interface cable in the orientation shown, insert the plug fully into the camera terminal
  .
.
5. Insert the large end of the plug into the compact power adapter.

6-A. CA-DC30: Flip out the plug  and plug the compact power adapter into a power outlet
  .
.
 and plug the compact power adapter into a power outlet
  .
.
6-B. CA-DC30E: Plug the power cord into the compact power adapter, then plug the other end into a power outlet.

7. Charging begins and the USB charge lamp lights up.
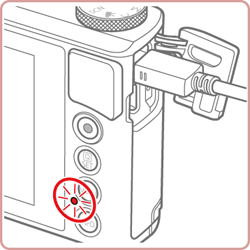
・The lamp turns off when charging finishes.
8. When charging has finished, remove the compact power adapter from the power outlet and the interface cable from the camera.
IMPORTANT
- To protect the battery pack and keep it in optimal condition, do not charge it continuously for more than 24 hours.
- When charging another battery pack, always disconnect the interface cable from the camera before replacing the battery pack for charging.
NOTE
- For more information on charging times and the number of images that can be captured with a fully charged battery, please refer to Estimated number of shots / recording time and playback time per battery (PowerShot G9 X Mark II).
- You can view images even while the battery is charging, by turning the camera on and entering Playback mode. However, you cannot shoot while the battery is charging. Also note that the camera cannot be used unless the battery is in it.
- Charged batteries gradually lose their charge, even when they are not used. Charge the battery on (or immediately before) the day of use.
- The compact power adapter can be used in areas with 100 – 240 V AC power (50/60 Hz). For power outlets in a different format, use a commercially available adapter for the plug. Never use an electrical transformer designed for traveling, which may damage the battery.
- Using a Computer to Charge the Battery
We recommend using Interface Cable IFC-600PCU (sold separately).
- Charging now begins, and the indicator on the back of the camera blinks in
green. Charging will be finished in about four hours.
- However, charging may take longer if you import images on the camera to the computer, as described in "Saving Images to a Computer".
- The indicator continues to blink in green even after charging is finished, as long as the camera is connected to the computer.

IMPORTANT
- Charging stops and the indicator goes off if, after you begin charging as described above, you press the power button to turn the camera off.
- With some computers, battery charging may require the memory card to be in the camera. Insert the memory card in the camera before connecting the cable to the computer's USB port.

