Clearing Jams
Solution
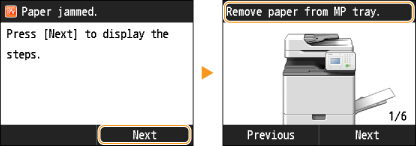
If a paper jams, <Paper jammed.> is displayed on the screen. Tap <Next> to display simple solutions. If it is difficult to understand the procedures on the display, see the following sections to clear jams.
IMPORTANT
When removing the jammed paper, do not turn OFF the machine
- Turning OFF the machine deletes the data that is being printed. Be especially careful when receiving fax documents.
If paper tears
- Remove all the paper fragments to prevent them from becoming jammed.
If paper jams repeatedly
- Tap the paper stack on a flat surface to even the edges of the paper before loading it into the machine.
- Check that the paper is appropriate for the machine.
- Check that no jammed paper fragments remain in the machine.
Do not forcibly remove the jammed document or paper from the machine
- Forcibly removing the paper may damage parts. If you are not able to remove the paper, contact your local authorized Canon dealer.
NOTE
Optional Cassette Feeding Unit are required to use Paper Drawer 2.
If there are documents placed in the feeder, remove them first. Then, follow the procedure below.
1. Remove the jammed document inside the feeder cover.
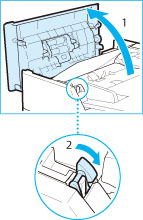
1-1. Open the feeder cover.
1-2. Lift the lever.
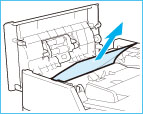
1-3. Gently pull out the document.
2. Remove the jammed document inside the inner cover of the feeder.
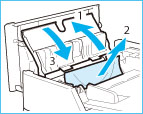
2-1. Open the inner cover of the feeder
2-2. Gently pull out the document.
2-3. Close the inner cover of the feeder.
3. Return the lever back in place, and close the feeder cover.
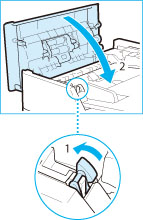
3-1. Return the lever to its original position.
3-2. Close the feeder cover.
4. Remove the jammed document in the underside of the feeder.
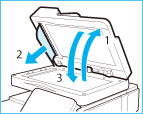
4-1. Open the feeder.
4-2. Gently pull out the document.
4-3. Close the feeder.
If any paper is loaded in the multi-purpose tray, first remove the paper. Next follow the procedure below to check for jammed paper.
1. Grip the handle, and open the right cover of the main unit.
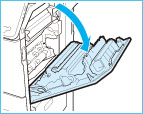
2. Gently pull out the paper from the paper drawer.
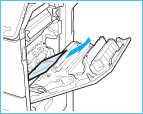
3. Gently pull out the paper from below the fixing assembly.
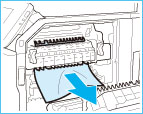
4. Gently pull out the paper from the output tray of the main unit.
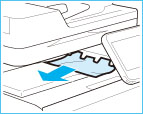
5. Gently pull out the paper from the area near the feed roller.
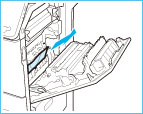
6. Remove any jammed paper from the duplexing unit.
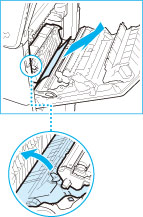
6-1. Lift the duplexing unit.
6-2. Gently pull out the paper.
6-3. Return the duplexing unit to its original position.
7. Close the right cover of the main unit.
If any paper is loaded in the multi-purpose tray, first remove the paper. Next follow the procedure below to check for jammed paper.
1. Grip the handle, and open the right cover of the main unit.

2. Remove the fixing assembly.
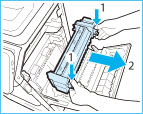
2-1. Hold the fixing assembly by the parts indicated in blue.
2-2. Remove the fixing assembly by pulling it out horizontally.
3. If jammed paper protrudes from the fixing assembly, remove it.
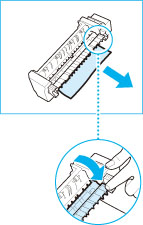
3-1. Place the fixing assembly on a flat surface.
3-2. Gently pull out the paper from the fixing assembly.
4. Install the fixing assembly.
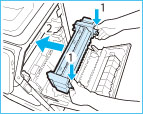
4-1. Hold the fixing assembly by the parts indicated in blue.
4-2. Align the fixing assembly with the frame and gently slide the fixing assembly back into place horizontally.
5. Close the right cover of the main unit.
1. Grip the handle, and pull out the paper drawer until it stops.
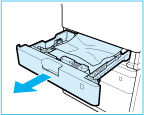
2. Gently pull out the paper.
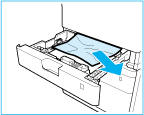
3. Gently push the paper drawer back into the machine.
If any paper is loaded in the multi-purpose tray, first remove the paper. Next follow the procedure below to check for jammed paper.
1. Remove any jammed paper from inside the right cover of the paper drawer.
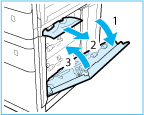
1-1. Open the right cover of the paper drawer.
1-2. Gently pull out the paper inside the right cover of the paper drawer.
1-3. Close the right cover of the paper drawer.
2. Remove any jammed paper from the paper drawer.
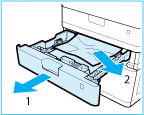
2-1. Pull out the paper drawer 2.
2-2. Gently pull out the paper from the paper drawer.
- Paper may be jammed in a location other than the paper drawer displayed on the display. Pull out each drawer and check whether there is any jammed paper.
3. Gently push the paper drawer back into the machine.

