Live View Shooting (Photos) with the Default Settings (EOS REBEL T5i / EOS 700D)
Solution
NOTE
Icons used on this page:
< >: Live View shooting/Movie shooting button / <
 >: Cross keys /
  ] [
] [  ]
]  ]: AF point /
  : JPEG Large/Fine
 >: Live View shooting/Movie shooting button / <
 >: Cross keys /
  ] [
] [  ]
]  ]: AF point /
  : JPEG Large/Fine
*The icons and markings indicating the camera’s buttons, dials, and settings correspond to the icons and markings on the camera and on the LCD monitor.
With your camera, you can shoot photos while viewing the image on the camera's LCD monitor. This is called "Live View shooting".
This page describes how to shoot still photos using the Live View function in default settings.
For details on how to change settings to enable Live View shooting, please refer to the related information section.
IMPORTANT
If you handhold the camera and shoot while viewing the LCD monitor, there are cases in which crisp images cannot be obtained due to camera shake. It is recommended to use a tripod when shooting.
1. Set the power switch to <ON>.
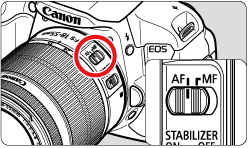
2. Set the lens focus mode switch to <AF>.
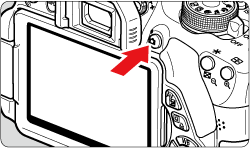
3. Press the < > button. The Live View image will appear on the LCD monitor.
 > button. The Live View image will appear on the LCD monitor.
4. Select an AF point.
- When a face is detected, the <
 > AF point will appear over the face to be focused.
 - If multiple faces are detected, <
 will be displayed. Press the <
 > key to move the <
 > frame over the desired target face.

- You can also tap the LCD monitor screen to select the face or subject. If the subject is not a face, <
 > will be displayed.
 - If no faces are detected or if you tap the LCD monitor but do not select any face or subject, the camera will switch to [FlexiZone - Multi] with automatic selection.
NOTE
- If the focus is far off, face detection will not be possible. If you set [Continuous AF] to [Enable], you can prevent the image from becoming greatly out of focus.
- An object other than a human face may be detected as a face.
- Face detection will not work if the face is very small or large in the picture, too bright or too dark, or partially hidden.
- The <
 > may cover only part of the face.
5. Press the shutter button halfway to focus.

- The AF point turns green if focus is achieved.
- If focus is not achieved, the AF point will turn orange.
6. Press the shutter button completely.
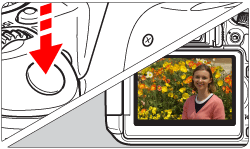
- The picture will be taken and the captured image is displayed on the LCD monitor.
- After the image review ends, the camera will return to Live View shooting automatically.
7. Press the < > button to end the Live View shooting.
 > button to end the Live View shooting.
CAUTION
During Live View shooting, do not point the lens toward the sun. The sun's heat can damage the camera's internal components.
NOTE
- The image’s field of view is approx. 99% (when the image-recording quality is set to JPEG
 ).
). - In Creative Zone modes, you can check the depth of field by pressing the depth-of-field preview button.
- During continuous shooting, the exposure set for the first shot will also be applied to subsequent shots.
- You can also tap the subject on the LCD monitor to focus and shoot.
- You can also use a remote controller (sold separately) for Live View shooting.

