Basic Copying Method
Solution
This section describes the basic procedure for copying.
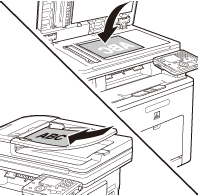
1. Place originals on the platen glass or load them in the feeder.
2. Press  (Main Menu).
 (Main Menu).
3. Use [  ] , [
] , [  ] or
] or  (Scroll Wheel) to select <Copy>, then press [OK].
 ] , [
] , [  ] or
] or  (Scroll Wheel) to select <Copy>, then press [OK].
4. Make the copy settings you require.
5. Use  -
-  (numeric keys) to enter the desired copy quantity (1 to 99).
 -
-  (numeric keys) to enter the desired copy quantity (1 to 99).
If you make a mistake when entering values, press  (Clear) and enter the correct values. The copy quantity appears on the right side of the Copy top screen.
 (Clear) and enter the correct values. The copy quantity appears on the right side of the Copy top screen.
NOTE
You cannot change the copy quantity while the machine is copying.
6. Press  (Start) to start copying.
 (Start) to start copying.
- When scanning is complete, remove your originals.

NOTE
You cannot change copy mode settings, such as the copy quantity, paper size, and copy ratio, while the machine is copying.
- To cancel all settings and return the machine to the Standard mode, press
 (Reset).
- If the machine remains idle for more than two minutes, the display returns to the Main Menu screen (Auto Clear Time). You can change the value of time for the Auto Clear Time.
- If you want to make another copy when there is an ongoing job, press the right Any key to select <Done>. Then repeat from the step 1.
7. Press  (Main Menu) to return to the Main Menu screen.
 (Main Menu) to return to the Main Menu screen.
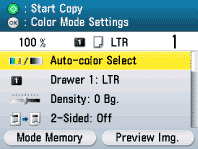
This section describes how to select the color mode (color/B&W).
The default setting is <Auto-color Select>.
1. Set originals.
2. Press  (Main Menu).
 (Main Menu).
3. Use [  ] , [
] , [  ] or
] or  (Scroll Wheel) to select <Copy>, then press [OK].
 ] , [
] , [  ] or
] or  (Scroll Wheel) to select <Copy>, then press [OK].
4. Use [  ] , [
] , [  ] or
] or  (Scroll Wheel) to display <Color Mode Settings>, then press [OK].
 ] , [
] , [  ] or
] or  (Scroll Wheel) to display <Color Mode Settings>, then press [OK].
5. Use [  ] , [
] , [  ] or
] or  (Scroll Wheel) to select the color mode, then press [OK].
 ] , [
] , [  ] or
] or  (Scroll Wheel) to select the color mode, then press [OK].
- <Auto-color Select>: For the automatic selection of color or B&W
- <Color>: For copies in full-color
- <Black>: For black and white copies
6. Use  -
-  (numeric keys) to enter the desired copy quantity (1 to 99).
 -
-  (numeric keys) to enter the desired copy quantity (1 to 99).
7. Press  (Start).
 (Start).
If you want to copy multiple originals using the platen glass, set an original and press  (Start) once for each page.
 (Start) once for each page.
8. Press  (Main Menu) to return to the Main Menu screen.
 (Main Menu) to return to the Main Menu screen.
You can select Paper Drawer 1 or Paper Drawer 2 (optional) as a paper source. You need to set the paper size and type for each drawer in advance.
1. Set originals.
2. Press  (Main Menu).
 (Main Menu).
3. Use [  ] , [
] , [  ] or
] or  (Scroll Wheel) to select <Copy>, then press [OK].
 ] , [
] , [  ] or
] or  (Scroll Wheel) to select <Copy>, then press [OK].
4. Use [  ] , [
] , [  ] or
] or  (Scroll Wheel) to display <Paper Source Settings>, then press [OK].
 ] , [
] , [  ] or
] or  (Scroll Wheel) to display <Paper Source Settings>, then press [OK].
5. Use [  ] , [
] , [  ] or
] or  (Scroll Wheel) to select the desired paper source, then press [OK].
 ] , [
] , [  ] or
] or  (Scroll Wheel) to select the desired paper source, then press [OK].
6. Use  -
-  (numeric keys) to enter the desired copy quantity (1 to 99).
 -
-  (numeric keys) to enter the desired copy quantity (1 to 99).
7. Press  (Start).
 (Start).
If you want to copy multiple originals using the platen glass, set an original and press  (Start) once for each page.
 (Start) once for each page.
8. Press  (Main Menu) to return to the Main Menu screen.
 (Main Menu) to return to the Main Menu screen.
This section describes how to copy onto paper in the stack bypass tray.
NOTE
The paper size/type setting screen appears only if <Stack Bypass Paper (Std.)> in <Paper Settings> of the <Additional Func.> menu is set to <Off>. If <Stack Bypass Paper (Std.)> is set to <On>, copying can be performed only with the registered paper size and type.
1. Set originals.
2. Press  (Main Menu).
 (Main Menu).
3. Use [  ] , [
] , [  ] or
] or  (Scroll Wheel) to select <Copy>, then press [OK].
 ] , [
] , [  ] or
] or  (Scroll Wheel) to select <Copy>, then press [OK].
4. Load the paper into the stack bypass tray.
5. Use [  ] , [
] , [  ] or
] or  (Scroll Wheel) to select the desired paper size, then press [OK].
 ] , [
] , [  ] or
] or  (Scroll Wheel) to select the desired paper size, then press [OK].
You can select from the following paper sizes:
<A4>, <A5>, <B5>
NOTE
The available paper sizes may vary depending on the country of purchase.
6. Use [  ] , [
] , [  ] or
] or  (Scroll Wheel) to select the desired paper type, then press [OK].
 ] , [
] , [  ] or
] or  (Scroll Wheel) to select the desired paper type, then press [OK].
You can select from the following paper types:
<Plain>, <Plain H>, <Recycled Paper>, <Color>, <Bond>, <Heavy 1>, <Heavy 2>, <Transparencies>, <Labels>, <Rough>
NOTE
If you want to print on the back side of printed paper, press the right Any key to select <2nd of 2-Sided>.
7. Press [OK] to select <Stack Bypass Tray>.
8. Use  -
-  (numeric keys) to enter the desired copy quantity (1 to 99).
 -
-  (numeric keys) to enter the desired copy quantity (1 to 99).
9. Press  (Start).
 (Start).
If you want to copy multiple originals using the platen glass, set an original and press  (Start) once for each page.
 (Start) once for each page.
10. Press  (Main Menu) to return to the Main Menu screen.
 (Main Menu) to return to the Main Menu screen.
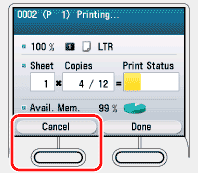
You can cancel scanning or printing of a copy job.
NOTE
After you cancel a copy job during scanning, be sure to remove the placed original.
1. Press the left Any key to select <Cancel>.
The display will return to the Copy top screen.
2. Press  (Main Menu) to return to the Main Menu screen.
 (Main Menu) to return to the Main Menu screen.
