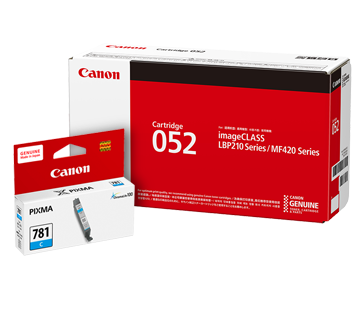
Replacing Drum Cartridges
Solution
This section describes how to replace or handle the drum cartridges and precautions on storing them.
Contact your local authorized Canon dealer to obtain replacement drum cartridges.
Drum cartridges are consumable products. When any drum cartridge is nearing the end of its life, any of the following messages appears in the display. Follow the directions in the message.
| Message | When it is Displayed | Contents and Remedies |
 (X indicates K, Y, M, or C) | When a drum cartridge needs to be replaced soon | - You can continue to print. - Have ready a new drum cartridge of the indicated color. - It is recommended that You replace the drum cartridge before printing a large amount of data. |
 (X indicates K, Y, M, or C) | The drum cartridge has reached the end of its life. | - The printer stops printing. - You can continue to print by pressing [Online], however, this may result in deterioration in print quality. - Replace the drum cartridge of the indicated color with a new one. |
 (X indicates K, Y, M, or C) | When the drum cartridge cannot be used | - The printer stops printing, and you cannot continue the job. - Replace the drum cartridge of the indicated color with a new one. |
NOTE
- The lifetime of the drum cartridges (Canon Genuine Drum Cartridges) used by this printer is as follows. The numbers of the pages are estimated when printing in the following conditions.
Paper size: A4; Paper type: Plain paper; Printing ratio: 5 %; Print density: the default; Continuous/1-sided Printing
- Black: Approx. 50,000 pages
- Yellow: Approx. 50,000 pages
- Magenta: Approx. 50,000 pages
- Cyan: Approx. 50,000 pages
- When printing at interval of 2 sheets (2-sheet intermittent printing), the lifetime of the drum cartridges (Canon Genuine Drum Cartridges) for this printer is approximately 45,000 pages for the black toner and approximately 40,000 pages for each color toner. These values are the number of pages that you can print when performing only color printing. Even when printing in black and white, each of the color drum cartridges is consumed. Therefore, when printing in black and white a lot, the lifetime of each of the color drum cartridges may be half the number of pages you can print.
- Depending on the printing preferences or printing environment such as the intermit printing, paper type, paper size, and 1-sided / 2-sided printing, the number of pages you can print may be half the number.
 Removing the Drum Cartridge to Be Replaced
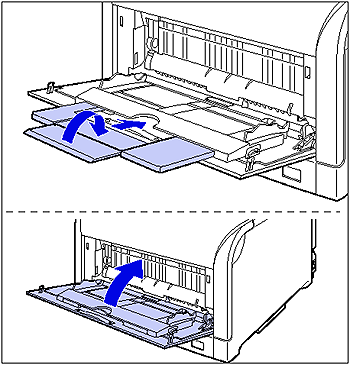
1. If you are using the multi-purpose tray, close it.
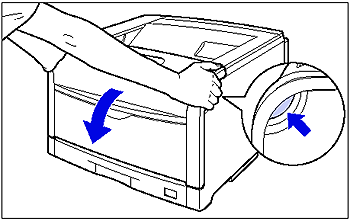
2. Open the front cover.
While pressing the lever on the right side of the front cover, open the front cover toward you.
IMPORTANT
Before opening the front cover, make sure that the multi-purpose tray and the paper cassette of the printer are closed.
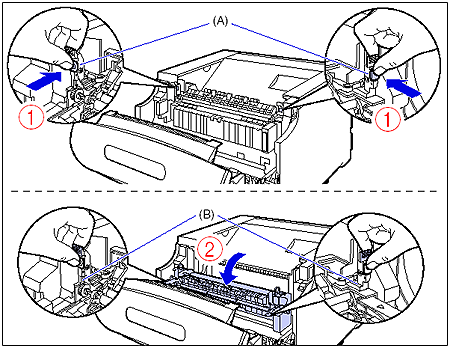
3. Tilt the fixing unit toward you.
While pressing the green lock release buttons (A) on the left and right side of the fixing unit (1), hold the tabs (B) and tilt the fixing unit toward you (2) as shown in the figure.
4. Open the top cover.
Press the blue lock release button of the top cover.
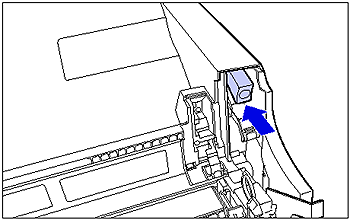
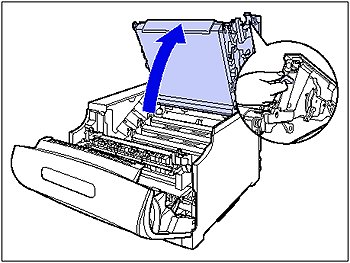
While holding the lever of the top cover, open the top cover.
5. Slide the blue lock release lever (A) of the drum cartridge to be replaced to the position of "  " to release the lock of the drum cartridge.
 " to release the lock of the drum cartridge.
Slide the lock release lever until the triangular mark on the lock release lever aligns with the triangular mark on the label.
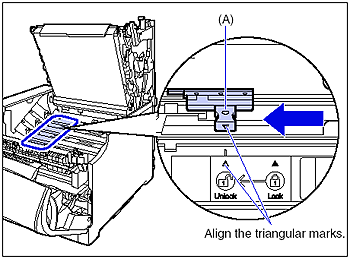
6. Remove the drum cartridge.

Remove the drum cartridge by holding the blue tab (A) as shown in the figure.

 Installing a New Drum Cartridge
1. Take the new drum cartridge out of the box.
2. Take the drum cartridge out of the protective bag.
IMPORTANT
Keep the protective bag for the drum cartridge. It may be required after taking out the drum cartridge for printer maintenance.
3. There are two types of replacement drum cartridges. Since the procedure varies depending on the packing condition, check the condition.
 If a packing material is provided in the following area
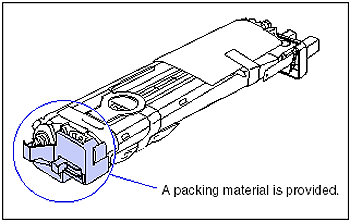
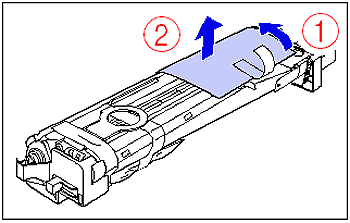
3-A-1. Remove the caution sheet from the drum cartridge, and read the contents thoroughly.
After removing the tape (1), remove the sheet (2).
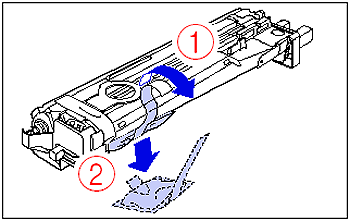
3-A-2. Remove the drying agent attached with tape (1 piece) shown in the figure.
Remove the tape (1), and then remove the drying agent (2).
IMPORTANT
Dispose of the removed drying agent according to local regulations.
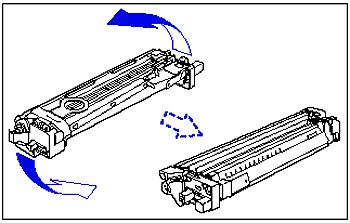
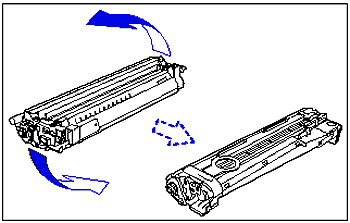
3-A-3. Turn over the drum cartridge in the direction of the arrow gently.
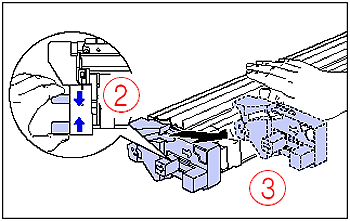
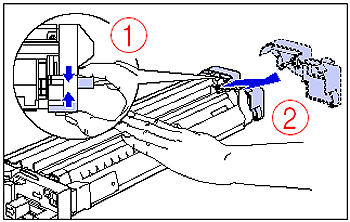
3-A-4. Remove the packing materials (2 pieces) on the both sides.
- Left side
Remove the tape (1 piece) shown in the figure (1).

While pinching the tabs of the packing material (2), remove it diagonally upward (3).
- Right side
While pinching the tabs of the packing material (1), remove it diagonally upward (2).
IMPORTANT
Dispose of the packing materials according to local regulations.
3-A-5. Turn the drum cartridge over gently to the original side.
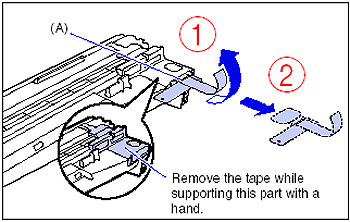
3-A-6. Remove the packing material attached with tape (A) (1 piece) shown in the figure.
Remove the tape (1), and then pull the packing material out (2).
Remove the tape gently while supporting the blue shutter with a hand.
IMPORTANT
Dispose of the packing materials according to local regulations.
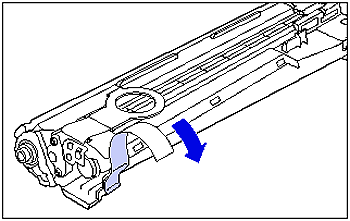
3-A-7. Remove the tape (1 piece) shown in the figure.
3-A-8. Proceed to Step 4.
 If tape is provided in the following area
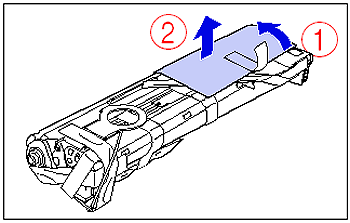
3-B-1. Remove the caution sheet from the drum cartridge, and read the contents thoroughly.
After removing the tape (1), remove the sheet (2).
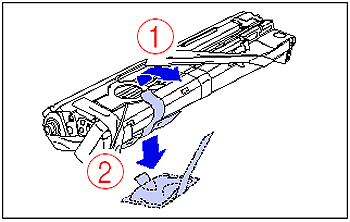
3-B-2. Remove the drying agent attached with tape (1 piece) shown in the figure.
Remove the tape (1), and then remove the drying agent (2).
IMPORTANT
Dispose of the removed drying agent according to local regulations.
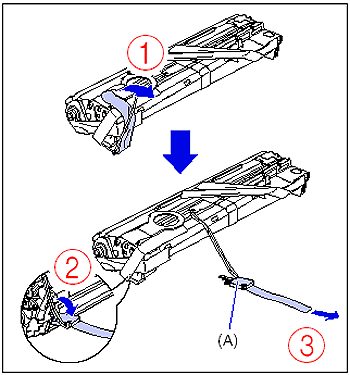
3-B-3. Remove the packing material attached with tape (A) (1 piece) shown in the figure.
Remove the tape (1) and packing material at the same time. If the packing material cannot be removed, tilt the packing material (2), and then remove it (3).
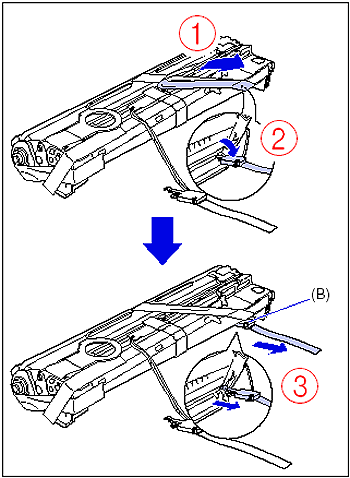
3-B-4. Remove the packing material attached with tape (B) (1 piece) shown in the figure.
Remove the tape (1) and packing material at the same time. If the packing material cannot be removed, tilt the packing material (2), and then remove it (3).
3-B-5. Remove the packing material attached with tape (C) (1 piece) shown in the figure.
Remove the tape (1), and then pull the packing material out (2).

3-B-6. Remove the tape (1 piece) and tags (2 pieces) shown in the figure.
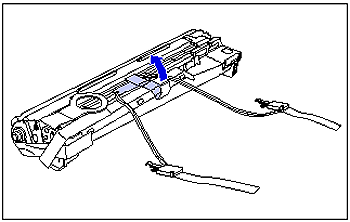
IMPORTANT
Dispose of the packing materials according to local regulations.
3-B-7. Remove the tape (3 pieces) shown in the figure in order of (1) and (2).
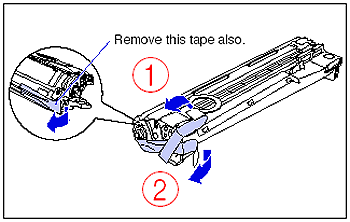
3-B-8. Proceed to Step 4.
4. Hold the blue tabs (A) of the drum cartridge and shake it up and down 10 to 12 times each as shown in the figure to evenly distribute the developer inside the cartridge.
Hold the blue tabs of the drum cartridge.

IMPORTANT
If the developer is not distributed evenly, this may result in deterioration in print quality. Be sure to carry out this procedure properly.
Shake the drum cartridge up and down 10 to 12 times each as shown in the figure.
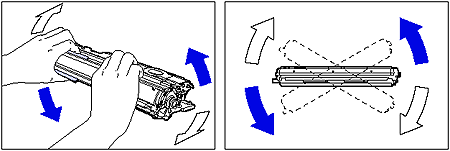
IMPORTANT
If the developer is not distributed evenly, this may result in deterioration in print quality. Be sure to carry out this procedure properly.
5. Place paper on a flat surface, place the drum cartridge on it, and then fold back the tab (A) of the sealing tape as shown in the figure.
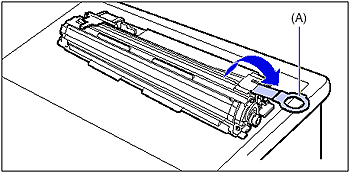
IMPORTANT
- When placing the drum cartridge, be sure to place paper under the drum cartridge to prevent a desk or others from being damaged by the bottom of the drum cartridge.
6. Pull the sealing tape (approx. 70 cm long) out gently and horizontally while supporting the drum cartridge.
When pulling the sealing tape out, you may feel it to be heavy. However, because this is not printer malfunction, pull the sealing tape out completely.

IMPORTANT
- If it is difficult to pull the sealing tape out by the tab, hold the tape and pull it out as shown in the figure. However, your hands may become dirty as toner is on the sealing tape.

- Do not pull the sealing tape diagonally, upwards, or downwards. If the tape is severed, it may become difficult to pull out completely.
- Pull out the sealing tape completely from the drum cartridge. If any tape remains in the drum cartridge, this may result in poor print quality.
- Dispose of the removed sealing tape according to local regulations.
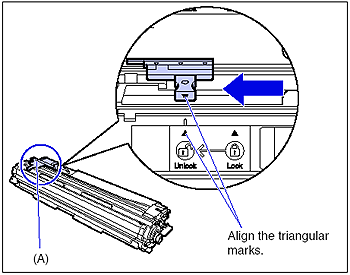
7. Before installing the drum cartridge, align the triangular mark on the lock release lever (A) with the triangular mark of "  " on the label as shown in the figure.
 " on the label as shown in the figure.
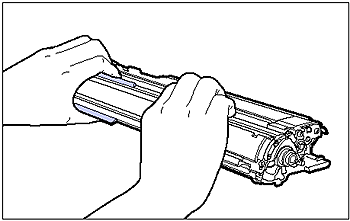
When installing the drum cartridge, hold the blue tabs as shown in the figure.
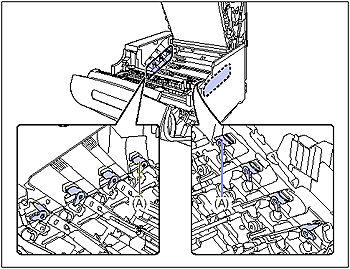
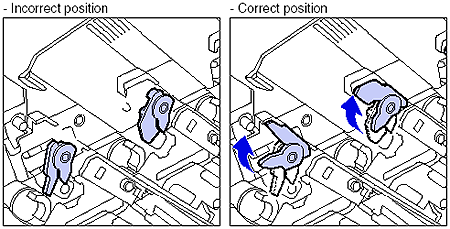
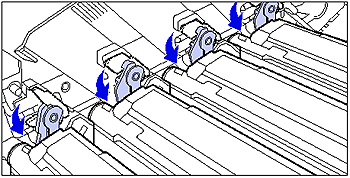
8. Make sure that the levers (A) near the drum cartridge guides on the both sides are in the proper position as shown in the figure.
If the levers are not in the proper position, the drum cartridges cannot be installed. Raise the levers to the proper position as shown in the figure.
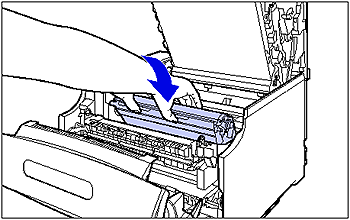
9. Install the drum cartridge in the printer.
Insert the drum cartridge firmly until it touches the back of the printer.
Insert the projections (A) on each side of the drum cartridge into the drum cartridge guides as shown in the figure.
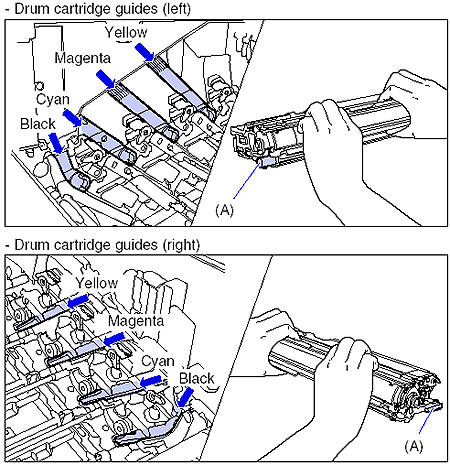
IMPORTANT
Insert the drum cartridges firmly until they touch the back of the printer. If the drum cartridges are not installed firmly, this may result in poor print quality.
10. Make sure that the levers near the drum cartridge guides on the both sides are in the proper position as shown in the figure.
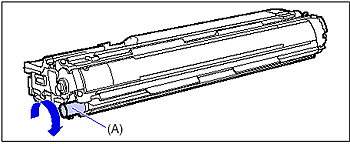
11. Make sure that the labels on the projections of the drum cartridge are visible.

If you cannot see any of the three colors on the label from the front, take out the drum cartridge once, turn the projection (A) in the direction of the arrow until it clicks and stops, and then reinstall the cartridge.
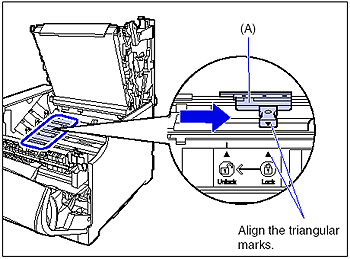
12. Slide the blue lock release lever (A) to the position of "  " to lock the drum cartridge.
 " to lock the drum cartridge.
Slide the lock release lever until the triangular mark on the lock release lever aligns with the triangular mark on the label.
13. Close the top cover.
Close the top cover of the printer while holding it by the lever (A) gently.
If you close the top cover forcefully, the ITB unit cover (B) may not move back to the original position, and this may result in damage to the printer.

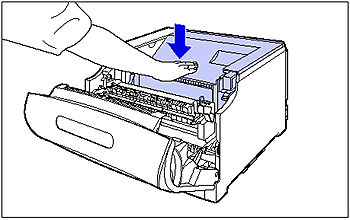
By pressing the portion indicated "PUSH", close the top cover firmly until it cannot be pressed down any further as shown in the figure.
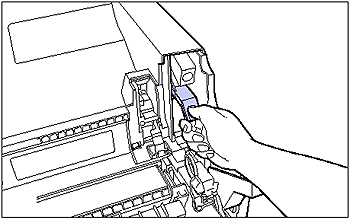
14. By holding the lever as shown in the figure, make sure that the top cover does not open.
IMPORTANT
Close the top cover firmly until it cannot be pressed down any further. If the top cover is not closed firmly, this may result in poor print quality.
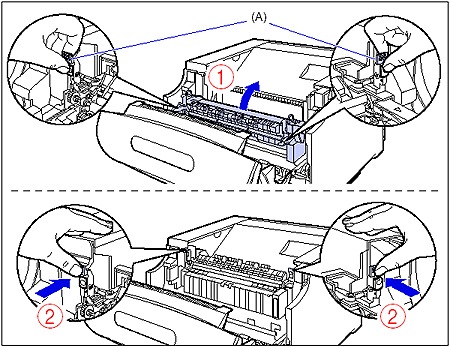
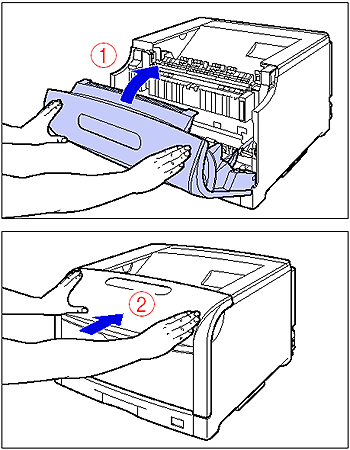
15. While holding the tabs (A), move the fixing unit back to its original position (1), and then press the tabs on the both sides as shown in the figure (2).
16. Close the front cover.
While supporting the front cover (1), push and close the front cover with both hands as shown in the figure (2).
IMPORTANT
- Be sure to use a drum cartridge designed for this printer.
- Do not install a used drum cartridge in the printer again. This may result in the life time of the drum cartridge not being detected properly, or damage to the cartridge.
- When handling a drum cartridge, hold the blue tabs (A) properly as shown in the figure. Do not place it vertically or upside-down.

- A drum cartridge comes in a protective bag. Do not take the drum cartridge out of the protective bag until the drum cartridge is ready to be set.
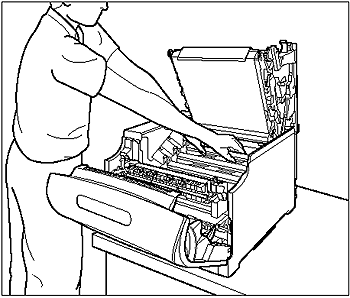
- When removing or installing the drum cartridges, work from the left side of the printer as shown in the figure.
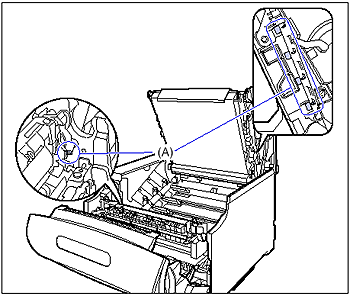
- Be sure not to touch the high-voltage contacts (A) shown in the following figures, as this may result in damage to the printer.
- Right side of the ITB unit; Inside of the printer
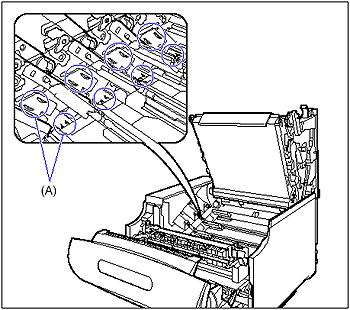
- Drum cartridge guides
- Dispose of the packing materials according to local regulations.
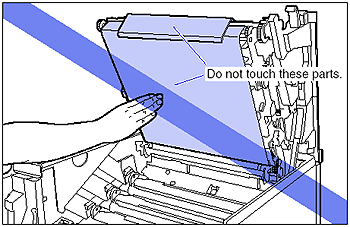
- Do not touch the transfer belt of the ITB unit and the ITB unit cover. If the transfer belt is damaged, this may result in misfeeds or deterioration in print quality. If the print quality deteriorates due to the transfer belt of the ITB unit being touched, see [Cleaning the Transfer Belt of the ITB Unit] and clean the transfer belt of the ITB unit. The transfer belt of the ITB unit is supplied with a function that cleans itself, therefore, you do not need to clean the belt even when toner is on it.
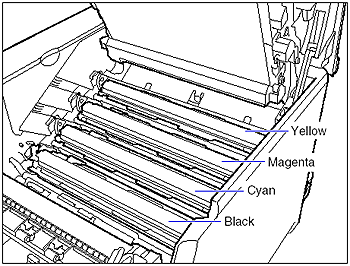
- The drum cartridges are installed from the bottom in order of Yellow, Magenta, Cyan, and Black.
- When pulling the sealing tape out, do not hold the area near the mouth of the sealing tape with your hand. If the tape is severed, it may become difficult to pull out completely.

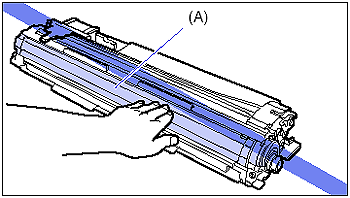
- When pulling the sealing tape out, be careful not to hold the drum protective shutter (A) with your hands.
NOTE
- For details on handling drum cartridges, see [Precautions for Handling Drum Cartridges].
- The packing materials may be changed in form or position to be placed, or may be added or removed without notice.

