Setting TX Reports to Print Automatically
Solution
This section describes how to set TX reports to print automatically.
The default settings are as follows:
- <TX Report>: Only When Error Occurs
- <Display Send Original>: On
- <Color Send Original Display>*: On
* This setting is available only when <Display Send Original> is set to <On>.

The following items are printed in a TX Report:
- REPORT NAME: When the document transmission is completed successfully, a "TX Report" is printed. When a send error occurs, an "Error TX Report" is printed.
- Transaction description
- TX/RX NO: Transaction number
- DEPT. ID: If Department ID Management is set, the Department ID is printed.
- RECIPIENT ADDRESS: Destination number or address
- DESTINATION ID: Destination name registered in the Address Book
- ST. TIME: Transmission start time
- TIME USE: Transmission duration
- PAGES SENT: Number of pages sent
- RESULT: Result of transaction
- OK: Transmission successful
- NG: Transmission failed
- STOP: Transmission manually canceled before completion
- If transmission is failed, the number of the page that could not be sent and error code are printed.
NOTE
- If the memory becomes full while the machine is scanning a document to be sent, the TX Report is not printed regardless of the setting.
- When a PC-Fax or sequential broadcast transmission was performed, part of the sent document is not printed even if you set <Display Send Original> to <On>.

- When a sequential broadcast transmission was performed, a Multiple Communication Result Report is printed instead of a TX Report.
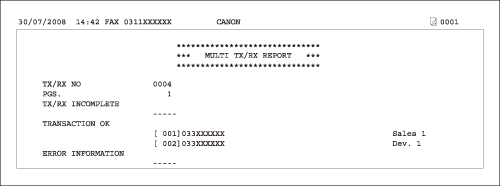
- For a Multiple Communication Result Report, the following items are displayed.
- TX/RX NO: Transaction number
- PGS.: The number of pages that were sent successfully
- DEPT. ID: If Department ID Management is set, the Department ID is printed.
- TX/RX INCOMPLETE: If a transmission is incomplete, the address and name of the destination are printed. If there is no applicable destination, "_ _ _ _ _" is printed.
- TRANSACTION OK: The address and name of the destination of a completed transmission are printed. If there is no applicable destination, "_ _ _ _ _" is printed.
- ERROR INFORMATION: If an error in transmission occurs, the address and name of the destination are printed. If there is no error, "_ _ _ _ _" is printed.
1. Press  (Main Menu).
 (Main Menu).
2. Press the right Any key to select <Additional Func.>.
3. Use [  ] , [
] , [  ] or
] or  (Scroll Wheel) to select <Report Settings>, then press [OK].
 ] , [
] , [  ] or
] or  (Scroll Wheel) to select <Report Settings>, then press [OK].
4. Use [  ] , [
] , [  ] or
] or  (Scroll Wheel) to select <Settings>, then press [OK].
 ] , [
] , [  ] or
] or  (Scroll Wheel) to select <Settings>, then press [OK].
5. Use [  ] , [
] , [  ] or
] or  (Scroll Wheel) to select <TX Report>, then press [OK].
 ] , [
] , [  ] or
] or  (Scroll Wheel) to select <TX Report>, then press [OK].
6. Use [  ] , [
] , [  ] or
] or  (Scroll Wheel) to select <Off>, <On> or <Only When Error Occurs>, then press [OK].
 ] , [
] , [  ] or
] or  (Scroll Wheel) to select <Off>, <On> or <Only When Error Occurs>, then press [OK].
- <Off>: Does not print a report. Skip to step 9.
- <On>: Prints a report every time you send a document. Proceed to step 7.
- <Only When Error Occurs>: Prints a report only when a transmission error occurs. Proceed to step 7.
7. Use [  ] , [
] , [  ] or
] or  (Scroll Wheel) to select <Off> or <On> for <Display Send Original>, then press [OK].
 ] , [
] , [  ] or
] or  (Scroll Wheel) to select <Off> or <On> for <Display Send Original>, then press [OK].
- <Off>: Does not print a part of the sent original on the report. Skip to step 9.
- <On>: Prints a part of the sent original on the report. Proceed to step 8.
8. Use [  ] , [
] , [  ] or
] or  (Scroll Wheel) to select <Off> or <On> for <Color Send Original Display>, then press [OK].
 ] , [
] , [  ] or
] or  (Scroll Wheel) to select <Off> or <On> for <Color Send Original Display>, then press [OK].
- <Off>: Does not print a part of the sent original on the report.
- <On>: Prints a part of the sent original on the report.
9. Press  (Main Menu) to return to the Main Menu screen.
 (Main Menu) to return to the Main Menu screen.


