How do I connect my camera to a computer?(EOS 5D Mark II)
26-May-2017
8200354600
Solution
This section describes how to connect the camera to a computer when importing images to the computer or specifying the camera settings from the computer.
NOTE
- Before connecting the camera to a computer, please install the EOS Utility software from the EOS Digital Solution Disk included with your camera. For more information on the installation procedure, please refer to Installing the Software from the EOS DIGITAL Solution Disk (Included on the CD-ROM or Downloadable from the Canon Homepage).
- Use the supplied USB cable to connect the camera to the computer.
- Start the computer before making the connection.
- To prevent disconnection while saving images to the computer or performing data transfer operations, using the AC adapter kit ACK-E6 (sold separately) as the camera's power supply while the camera is connected to the computer is recommended.
1. Confirm that the camera is not connected to the computer, and then set the camera's power switch to <  >(Quick Control Dial).
>(Quick Control Dial).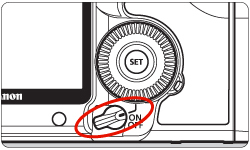
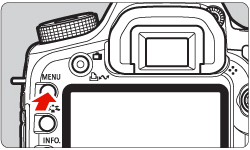
2. Press the <MENU> button to display the menu.
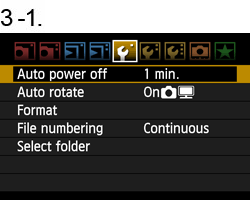
3. Change the camera's Auto power off settings. When the Auto Power Off setting is activated, the camera may turn off automatically when connected to other devices. As connections will be ended if the camera turns off, please make sure to deactivate the Auto Power Off setting before making connections.
3-1. Turn the <Main Dial> to select the [  ] tab, and then turn the <Quick Control Dial> to select [Auto power off].
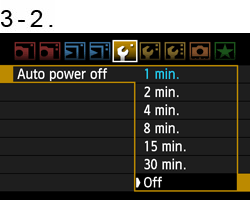
] tab, and then turn the <Quick Control Dial> to select [Auto power off].3-2. Press the <SET> button and turn the <Quick Control Dial> to select [Off] from the menu that appears, and then press the <SET> button again.
Please refer to the Instruction manual supplied with your camera for more information about the Auto power off settings.

4. Press the <MENU> button and turn off the display on the LCD monitor, and then turn the camera's power switch to <OFF>.
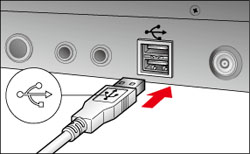
5. Plug the supplied USB cable into the USB port on your computer. The port's location differs between computers. Please refer to the documentation provided with your computer for more information.
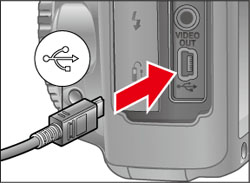
6. Connect the other end of the USB cable to the <DIGITAL> terminal on the camera.
7. Turn the camera's power switch to <ON>.
8. EOS Utility opens and the communications between the camera and the computer start.
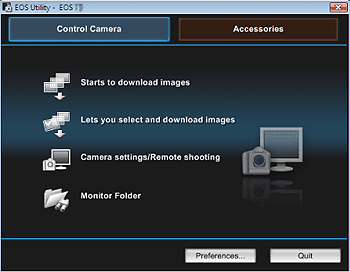
If EOS Utility does not start automatically, click the [Start] button (or  button), then select [All Programs], [Canon Utilities], [EOS Utility], and then [EOS Utility]. If you use Mac OS X, click the [EOS Utility] icon registered in the Dock.
button), then select [All Programs], [Canon Utilities], [EOS Utility], and then [EOS Utility]. If you use Mac OS X, click the [EOS Utility] icon registered in the Dock.The message that appears on the screen differs depending on the computer's operating system or software installed in the computer, and also depending on whether the camera is being connected to the computer for the first time or has been connected previously.
If a window to select a program (application) appears, select [Canon EOS Utility], and then click [OK]. (If you use Windows Vista, select [Downloads images EOS camera].)

For information about operations after connecting the camera to the computer, please refer to the links in the related information section below.
This completes the process of connecting the camera to the computer.