Saving Images to a Computer using Windows (Windows 10) (Interchangeable-lens Digital Cameras)
20-Sep-2019
8203696400
Solution
You can connect the camera to a computer via a USB cable, and save images to a computer running Windows OS without installing any additional software applications.
IMPORTANT
- Depending on the camera model, a USB cable may not be included with the camera.
- If you do not own a USB cable, please purchase one separately.
REFERENCE
The following two types of USB cables are available for Interchangeable-lens Digital Cameras:
- Camera end: Mini-B (IFC-400PCU/IFC-200U/IFC-500U)
- Camera end: Micro-B (IFC-600PCU)
*For more information about the type of USB cable that can be used with your camera, please refer to the camera’s instruction manual.
1. Connect the camera to the computer.
- With the camera turned off, open the cover (
 ).
). - With the smaller plug of the cable in the orientation shown, insert the plug fully into the camera terminal (
 ).
).
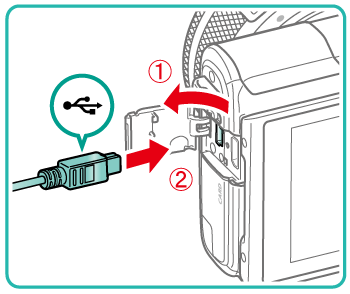
IMPORTANT
Example procedures are shown on the EOS M100. The position and shape of the operation buttons, screens displayed, and setting items may differ according to the model you use.
Insert the larger plug of the cable in the computer’s USB port.
For details about USB connections on the computer, refer to the computer user manual.

2. Turn on the camera.
Press the <  > button.
 > button.
NOTE
If an application for saving images starts, close it.
3. Click [File Explorer] on the taskbar appearing on the bottom of the screen.

4. When the following screen appears, select [This PC] from the menu items on the left side.

5. Select the camera connected to the PC ( ), and then right-click on the icon. Next, select [Import pictures and videos] (
 ) from the screen displayed.
 ), and then right-click on the icon. Next, select [Import pictures and videos] (
 ) from the screen displayed.
6. Click [Next] when the [Import Pictures and Videos] screen is displayed.
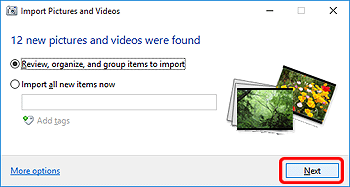
7. Click [Import] to begin image transfer.

NOTE
- [Select All] is set by default.
- To select images to import individually, remove the check from [Select All], and append desired images with a [
 ].
].
8. Image import (transfer) begins.
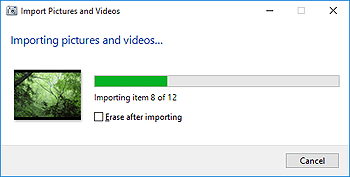
9. When image transfer is complete, a screen similar to the following one appears.

This completes the procedures for importing images.
To prevent software applications from starting automatically, follow the procedures below to change the [AutoPlay] settings.
1. Click the [Start] button appearing at the bottom left of the screen ( ), and then choose [Settings] (
 ).
).
 ), and then choose [Settings] (
 ).
).
2. Choose [Devices] from the screen displayed.
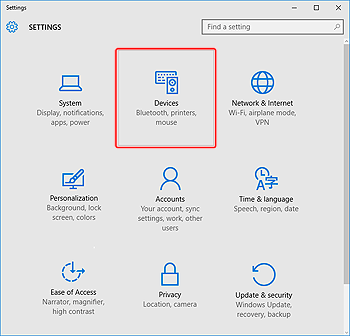
3. Select [AutoPlay] ( ) from the options appearing on the left of the screen to display the AutoPlay setting screen, select the camera (
 ) connected to the computer and right-click the icon.
 ) from the options appearing on the left of the screen to display the AutoPlay setting screen, select the camera (
 ) connected to the computer and right-click the icon.
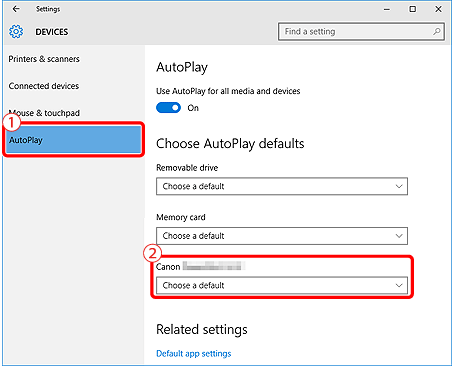
4. Make the settings.
- Choose [Open device to view files (File Explorer)].

This completes the procedure for changing the AutoPlay settings.