Registering a Paper Size and Type
29-Mar-2017
8203474800
Solution
You must specify the paper size and type settings to match the paper that is loaded. Make sure to change the paper settings when you load the paper that is different from the previously loaded paper.
IMPORTANT
- If the setting does not match the size and type of loaded paper, a paper jam or printing error may occur.
1. Select <Paper Settings> in the Home screen.
2. Select the target paper drawer.
-
 (<Drawer 2>) is displayed only when the optional cassette feeding module is installed.
Touch panel model

Black and white LCD model

3. Select the paper size.
- If the loaded paper size is not displayed, select <Other Sizes>.

 When loading custom size paper (Touch panel model)
3-1. Select <Custom>.
3-2. Specify the length of the <X> side and <Y> side.
- Select <X> or <Y>, and enter the length of each side using the numeric keys.
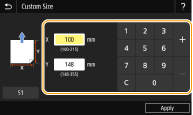

- If you register the paper size you use frequently on buttons <S1> to <S3>, you can call them up with one touch. For details on the procedure for Registering, see "Registering a Custom Paper Size".
3-3. Select <Apply>.

When loading A5 size paper
- In the landscape orientation, select <A5>. In the portrait orientation, select <A5R>.
Landscape orientation
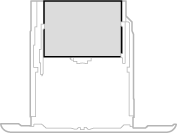
Portrait orientation

About <Free>
- If you frequently need to change the paper to be loaded, set to <Free>; this will reduce the number of steps required to change the setting each time. You can also display an error message when the setting in the printer driver is significantly different from the size of the loaded paper.
4. Select the paper type.


About <Free>
- The machine operates based on the paper type setting in the printer driver. When the paper type is [Auto], the machine operates the same way as when the paper type is [Plain 1].
The screen shown here is displayed when paper is loaded in the multi-purpose tray. Follow the on-screen instructions to specify settings that match the size and type of the loaded paper.
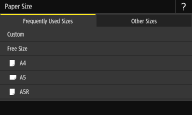
NOTE
If the screen shown above is not displayed when paper is loaded
- If you always load the same paper in the multi-purpose tray, you can skip the paper setting operations by registering the paper size and type as the default setting. When the default setting is registered, however, the screen shown above is not displayed. To display the screen, select <Specify When Loading Paper>.
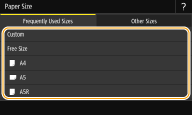
1. Select the paper size.
- If the loaded paper size is not displayed, select <Other Sizes>.
 When loading custom size paper
1-1. Select <Custom>.
1-2. Specify the length of the <X> side and <Y> side.
Touch panel model
- Select <X> or <Y>, and enter the length of each side using the numeric keys.


- If you register the paper size you use frequently on buttons <S1> to <S3>, you can call them up with one touch. For details on the procedure for Registering, see "Registering a Custom Paper Size".
Black and white LCD model
- Execute the following steps in sequence: <X>
 enter the paper width


 <Y>
<Y>  enter the paper length


1-3. Select <Apply>.

When loading A5 size paper
- In the landscape orientation, select <A5>. In the portrait orientation, select <A5R>.
Example for LBP654Cx / LBP653Cdw:
Landscape orientation

Portrait orientation

About <Free>
- If you frequently need to change the paper to be loaded, set to <Free>; this will reduce the number of steps required to change the setting each time. You can also display an error message when the setting in the printer driver is significantly different from the size of the loaded paper.
2. Select the paper type.


About <Free>
- The machine operates based on the paper type setting in the printer driver. When the paper type is [Auto], the machine operates the same way as when the paper type is [Plain 1].
You can register default paper settings for the multi-purpose tray. Registering default settings can save yourself the effort of having to specify the settings each time you load the same paper into the multi-purpose tray.
NOTE
- After the default paper setting is registered, the paper setting screen is not displayed when paper is loaded, and the same setting is always used. If you load a different paper size or type without changing the paper settings, the machine may not print properly. To avoid this problem, select <Specify When Loading Paper> in step 3, and then load the paper.
1. Select <Paper Settings> in the Home screen.
2. Select multi-purpose tray.
Touch panel model

Black and white LCD model

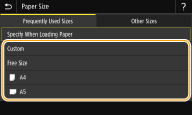
3. Select the paper size.
- If the loaded paper size is not displayed, select <Other Sizes>.
 Registering a custom paper size
3-1. Select <Custom>.
3-2. Specify the length of the <X> side and <Y> side.
Touch panel model
- Select <X> or <Y>, and enter the length of each side using the numeric keys.


- If you register the paper size you use frequently on buttons <S1> to <S3>, you can call them up with one touch. For details on the procedure for Registering, see "Registering a Custom Paper Size".
Black and white LCD model
- Execute the following steps in sequence: <X>
 enter the paper width


 <Y>
<Y>  enter the paper length


3-3. Select <Apply>.

When loading A5 size paper
- In the landscape orientation, select <A5>. In the portrait orientation, select <A5R>.
Example for LBP654Cx / LBP653Cdw:
Landscape orientation

Portrait orientation

About <Free>
- If you frequently need to change the paper to be loaded, set to <Free>; this will reduce the number of steps required to change the setting each time. You can also display an error message when the setting in the printer driver is significantly different from the size of the loaded paper.
4. Select the paper type.


About <Free>
- The machine operates based on the paper type setting in the printer driver. When the paper type is [Auto], the machine operates the same way as when the paper type is [Plain 1].
You can register up to three frequently used custom paper sizes.
1. Select <Paper Settings> in the Home screen.
2. Select <Register Custom Paper>.
3. Select the registration number.
- On the black and white LCD model, if you have selected the registered number, continue on to select <Edit>.

Deleting a setting
- Select <Delete>
 <Yes>.
4. Specify the length of the <X> side and <Y> side.
 Touch panel model
- Select <X> or <Y>, and enter the length of each side using the numeric keys.

 Black and white LCD model
- Execute the following steps in sequence: <X>
 enter the paper width


 <Y>
<Y>  enter the paper length


5. Select <Apply>.
6. On the black and white LCD model, continue on to select the paper type.


About <Free>
- The machine operates based on the paper type setting in the printer driver. When the paper type is [Auto], the machine operates the same way as when the paper type is [Plain 1].
 Setting to the registered custom size
 Touch panel model
The paper sizes that are registered in the procedure above can be called when <Custom> is selected on the paper size selection screen for the paper drawer or multi-purpose tray.

 Black and white LCD model
The paper sizes that are registered in the procedure above are displayed on the paper size selection screen for the paper drawer or multi-purpose tray.
Example for multi-purpose tray:

You can ensure that only frequently used paper sizes are shown in the screen for selecting the paper size setting.
1. Select <Paper Settings> in the Home screen.
2. Select <Select Frequently Used Paper Sizes>.
3. Select the paper source you want to limit the paper sizes to be displayed for.

4. Clear the check boxes for paper sizes you do not want displayed.
- Ensure that only the check boxes for frequently used paper sizes are selected.


- Paper sizes that are not selected can be viewed by selecting <Other Sizes> in the paper size setting selection screen.
5. Select <Apply>.
Enable or disable the automatic paper source selection feature for each paper source. If this feature is set to <On>, the machine automatically selects a paper source that is loaded with paper of the appropriate size for each print job. Also, when the paper in the selected paper source runs out, this feature enables continuous printing by switching from that paper source to another that is loaded with the same paper size.
1. Select <Menu> in the Home screen.
2. Select <Function Settings>  <Common>
  <Paper Feed Settings>.
 <Common>
  <Paper Feed Settings>.
3. Select <Paper Source Auto Selection>/<Drawer Auto Selection On/Off>.
4. Select the target function.
- When the target function is report/list printing or memory media print, select <Other>.

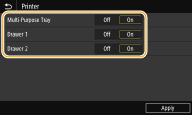
5. Specify <On> for each target paper source.
- <Drawer 2> is displayed only when the machine is equipped with the cassette feeding module (option).
 Touch panel model
For each target paper source, select <On>.
 Black and white LCD model
Select the target paper source  <On>.
<On>.
 <On>.
<On>.
- Always specify <On> for at least <Drawer 1> or <Drawer 2>. If you specify <Off> for the both, then you cannot finish the setting procedure.
6. Select <Apply>.