Shooting Multiple Exposures (EOS 5DS / EOS 5DS R)
18-May-2015
8202568200
Solution
You can shoot two to nine exposures to be merged into one image. If you shoot multiple-exposure images with Live View shooting, you can see how the single exposures are being merged while shooting.
1. Set the camera’s power switch to [ON].
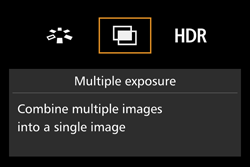
2. Press the [  ] button.
 ] button.
3. Turn the [  ] dial to select [
  ], then press [
  ].
].
 ] dial to select [
  ], then press [
  ].
].
NOTE
You can also set multiple exposure with [  : Multiple exposure].
 : Multiple exposure].
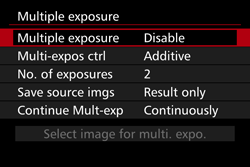
4. Select [Multiple exposure].
Turn the [  ] dial to select [Multiple exposure], then press [
  ].
].
 ] dial to select [Multiple exposure], then press [
  ].
].
5. Turn the [  ] dial to select [On:Func/Ctrl] or [On:ContShtng], then press [
  ].
].
 ] dial to select [On:Func/Ctrl] or [On:ContShtng], then press [
  ].
].
| On: Func/Ctrl (Function and control priority) | Convenient when you want to shoot multiple exposures while checking the result as you proceed. During continuous shooting, the continuous shooting speed will decrease greatly |
|---|---|
| On: ContShtng (Continuous shooting priority) | Geared for continuous multiple-exposure shooting of a moving subject. Continuous shooting is possible, but the following operations are disabled during shooting: menu viewing, Live View display, image review after image capture, image playback, and undo last image. Also, only the multiple-exposure image will be saved. (The single exposures merged in the multiple-exposure image will not be saved.) |
6. Set [Multi-expos ctrl].
Turn the [  ] dial to select [Multi-expos ctrl], then press [
  ].
].
 ] dial to select [Multi-expos ctrl], then press [
  ].
].
7. Turn the [  ] dial to select the desired multiple-exposure control method, then press [
  ].
].
 ] dial to select the desired multiple-exposure control method, then press [
  ].
].
| Additive | The exposure of each single exposure is added cumulatively. Based on the [No. of exposures], set a negative exposure compensation. Refer to the basic guide below to set a negative exposure compensation. Exposure Compensation Setting Guide for Multiple Exposures Two exposures: -1 stop, three exposures: -1.5 stop, four exposures: -2 stops |
|---|---|
| Average | Based on the [No. of exposures], negative exposure compensation is set automatically as you shoot multiple exposures. If you shoot multiple exposures of the same scene, the exposure of the subject’s background will be automatically controlled to obtain a standard exposure. |
| Bright/Dark | The brightness (or darkness) of the base image and the images to be added are compared at the same position, and then the bright (or dark) part will be left in the picture. Depending on the overlapping colors, the colors may be mixed depending on the brightness (or darkness) ratio of the compared images. |
IMPORTANT
- If [On:Func/Ctrl] and [Additive], [Bright], or [Dark] are both set, the image displayed during shooting may look noisy. However, when you finish shooting the set number of exposures, noise reduction will be applied and the final multiple-exposure image will be less noisy.
- If [Additive], [Bright], or [Dark] is set, the image processing after taking the multiple exposures will take time. (The access lamp will light up for longer than usual.)
- If you perform Live View shooting while [On:Func/Ctrl] and [Additive] are both set, the Live View function will stop automatically when the multiple-exposure shooting ends.
8. Set the [No. of exposures].
Turn the [  ] dial to select [No. of exposures], then press [
  ].
].
 ] dial to select [No. of exposures], then press [
  ].
].
9. Turn the [  ] dial to select the number of exposures, then press [
  ].
].
 ] dial to select the number of exposures, then press [
  ].
].You can set it from 2 to 9 exposures.

10. Set the images to be saved.
Turn the [  ] dial to select [Save source imgs], then press [
  ].
].
 ] dial to select [Save source imgs], then press [
  ].
].
11. Turn the [  ] dial to select the desired images, then press [
  ].
].
 ] dial to select the desired images, then press [
  ].
].
- To save all the single exposures and the merged multiple-exposure image, select [All images].
- To save only the merged multiple exposure image, select [Result only].
12. Set [Continue Mult-exp].
Turn the [  ] dial to select [Continue Mult-exp], then press [
  ].
].
 ] dial to select [Continue Mult-exp], then press [
  ].
].
13. Turn the [  ] dial to select [1 shot only] or [Continuously], then press [
  ].
].
 ] dial to select [1 shot only] or [Continuously], then press [
  ].
].
- With [1 shot only], multiple-exposure shooting will be canceled automatically after the shooting ends.
- With [Continuously], multiple-exposure shooting continues until the setting in steps 4- 5 is set to [Disable].
14. Take the first exposure.
When [On:Func/Ctrl] is set, the captured image will be displayed.
- The number of remaining exposures is displayed in brackets '[ ]' (
 ) in the viewfinder or on the screen.

- Pressing the [
 ] button enables you to view the captured image.
IMPORTANT
If you perform Live View shooting while [On:ContShtng] is set, the Live View function will stop automatically after the first shot is taken. From the second shot onward, shoot while looking through the viewfinder.
15. Shoot subsequent exposures.
When [On:Func/Ctrl] is set, the merged multiple-exposure image will be displayed.
- With Live View shooting, the multiple exposure images merged so far will be displayed. By pressing the [INFO.] button, you can display only the Live View image.
- After you shoot the set number of exposures, multiple-exposure shooting will exit. With continuous shooting, after you finish shooting the set number of exposures while holding down the shutter button, the shooting will stop.
IMPORTANT
- The image-recording quality, ISO speed, Picture Style, high ISO speed noise reduction and color space, etc. set for the first single exposure will also be set for the subsequent exposures.
- You cannot use crop shooting or shoot with a set aspect ratio for multiple exposures. [Full-frame] will be applied for [
 : Crop/aspect ratio] for shooting.
 - During multiple exposure shooting, the settings of [
 : Lens aberration correction],
  : Auto Lighting Optimizer], and [
  : Highlight tone priority] will be automatically switched to [Disable].
 - If [
 : Picture Style] is set to [Auto], [Standard] will be applied for shooting.
 - With multiple exposures, the more exposures there are, the more noticeable the noise, irregular colors, and banding will be. Also, as noise increases with higher ISO speeds, shooting at low ISO speeds is recommended.
- In step 15, the brightness and noise of the multiple-exposure image displayed during Live View shooting will be different from the final multiple-exposure image recorded.
- If [On:ContShtng] is set, let go of the shutter button after shooting the set number of exposures.
- If the power switch is set to [OFF], the battery is replaced, or if you switch to movie shooting, multiple-exposure shooting will be canceled.
- If you switch the shooting mode to [
 ] or [ C1/C2/C3 ] while shooting, multiple-exposure shooting will end.
 - If you connect the camera to a computer or printer, multiple-exposure shooting will not be possible. If you connect the camera to a computer or printer during shooting, multiple-exposure shooting will stop.
NOTE
When [On:Func/Ctrl] is set, you can press the [  ] button to view the multiple exposures taken so far or delete the last single exposure.
 ] button to view the multiple exposures taken so far or delete the last single exposure.
When [On:Func/Ctrl] is set and you have not finished shooting the set number of exposures, you can press the [  ] button to view the merged multiple-exposure image so far. You can check how it looks and the exposure. (Not possible when [On:ContShtng] is set.) If you press the [
  ] button, the operations possible during multiple exposure shooting will be displayed.
 ] button to view the merged multiple-exposure image so far. You can check how it looks and the exposure. (Not possible when [On:ContShtng] is set.) If you press the [
  ] button, the operations possible during multiple exposure shooting will be displayed.
| Operation | Description |
|---|---|
 Undo last image Undo last image |
Deletes the last image you shot (shoot another image). The number of remaining exposures will increase by 1. |
 Save and exit Save and exit |
If [Save source imgs: All images] is set, all of the single exposures and the merged multiple-exposure image will be saved before exiting. If [Save source imgs: Result only] is set, only the multiple-exposure image merged so far will be saved before exiting. |
 Exit without saving Exit without saving |
None of the images will be saved before exiting. |
 Return to previous screen Return to previous screen |
The screen before you pressed the [  ] button will reappear. ] button will reappear. |
IMPORTANT
During multiple-exposure shooting, you can only play back multiple-exposure images.