Connecting the camera to a TV (PowerShot D30)
18-Feb-2014
8202047900
Solution
By connecting the camera to a TV, you can view your shots on the larger screen of the TV.
For details on connection or how to switch inputs, refer to the TV manual.
IMPORTANT
- Some information may not be displayed on the TV
Connecting the camera to an HDTV with the HDMI Cable HTC-100 (sold separately) enables you to view your shots on the larger screen of the TV.Movies shot at a resolution of [  ] or [
  ] can be viewed in high definition.
 ] or [
  ] can be viewed in high definition.
IMPORTANT
- Camera operating sounds are not played while the camera is connected to an HDTV.
- The camera may not always respond correctly even with HDMI CEC-compatible TVs.
- When the camera is connected to a TV with the HDMI cable, it is not possible shoot while previewing shots on the larger screen of the TV.
NOTE
Using the HDMI CEC function
- Depending on the TV, you may need to adjust some of the TV's settings. For details, refer to the TV manual.
- When using the HDMI CEC function, follow the steps below to make settings before connecting the camera to a TV.
1. Press the < > button to display the window below.
 > button to display the window below.
2. Press the < ><
>< ><
>< ><
>< > buttons to choose the
  [Set up] (
 ) tab, and then set
  [Ctrl via HDMI] to [Enable].
 ><
>< ><
>< ><
>< > buttons to choose the
  [Set up] (
 ) tab, and then set
  [Ctrl via HDMI] to [Enable].
3. Press the < > button.
 > button.
1. Make sure the camera and TV are off.
2. On the HDTV, insert the cable plug of the commercially available HDMI cable fully into the TV’s [HDMI input] as shown.

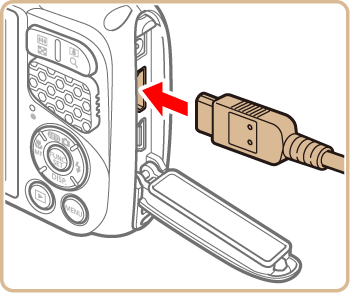
3. On the camera, open the terminal cover and insert the plug of the commercially available HDMI cable fully into the camera’s [HDMI terminal].

4. Turn the TV on and switch to HDMI video input.
5. Press the <Playback> ( ) button to turn on the camera.
 ) button to turn on the camera.
Images from the camera are now displayed on the TV. (Nothing is displayed on the camera screen.)
NOTE
While the HDMI CEC function is in use, you can control the camera with the TV’s remote control.
- Press the remote control's <
 ><
>< > buttons to choose an image.
To display the camera control panel, press the OK/Select button. Select control panel options by pressing the < ><
>< > buttons to choose an option, and then pressing the OK/Select button again.
 ><
>< > buttons to choose an option, and then pressing the OK/Select button again.
<Camera Control Panel Options Shown on the TV>
 [Return] : Closes the menu.
 [Play Movie] : Starts movie playback. (Only displayed when a movie is selected.)
 [Slideshow] : Starts slideshow playback. To switch images during playback, press the <
  ><
>< > buttons on the remote control.
 [Index Playback] : Displays multiple images in an index.
 [Change Display] : Switches display modes.
- Pressing buttons, such as the <
 > button, on the camera will switch control to the camera itself, which will prevent remote control until you return to single-image display.
Connecting the camera to a TV with the [AV Cable AVC-DC400] (sold separately) enables you to view your shots on the larger screen of the TV as you control the camera.
IMPORTANT
- Correct display is not possible unless the camera video output format (NTSC or PAL) matches the TV format. To change the video output format, press the <
 > button and choose [Video System] on the [Shooting] (
 ) tab.
1. Make sure the camera and TV are off.
2. On the TV, insert the cable plugs fully into the video inputs as shown.

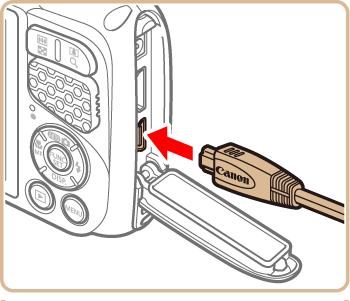
3. Connect the optional AV Cable to the camera’s [A/V OUT / DIGITAL] terminal.

4. Turn the TV on and switch to video input.
5. Press the <Playback> ( ) button to turn on the camera.
 ) button to turn on the camera.
Images from the camera are now displayed on the TV. (Nothing is displayed on the camera screen.)
When finished, turn off the camera and TV before disconnecting the optional AV Cable.
NOTE
When the camera and TV are connected, you can also shoot while previewing shots on the larger screen of the TV. To shoot, follow the same steps as when using the camera screen. However, AF-Point Zoom, Stitch Assist, and MF-Point Zoom are not available.